 If you’ve just started taking guitar lessons,
tuning your guitar can be one of the most intimidating things about picking it up to practice. Some new guitar students may skip tuning so they can get to the fun part: playing guitar.
Don’t be tempted to do that. If you get in the habit of playing an out-of-tune guitar, it will take longer for your ear to develop. You might even think that you’re playing incorrectly when you aren’t, because nothing sounds quite right. Or, you might adjust your playing so that incorrect chord voicings or scales sound correct. That type of confusion can really sabotage your guitar learning process.
A well tuned guitar will help you get the most out of your guitar lessons, so it’s important to make sure your guitar is in tune before each practice session. Not sure how to tune your guitar? Well, there are a few different methods, but for right now, let’s talk about relative tuning.
How to Tune Your Guitar With Relative Tuning
This is one of the most common methods of tuning the guitar, and every guitarist should know how to do it. When you use the relative tuning method, you’re tuning your guitar to itself. This might not work so well if you’re playing music with other musicians, but if you’re just practicing on your own, it works just fine.
To start, you’ll need to tune string 6, also known as the ‘low E’ string. If you have another instrument to tune it to, such as a keyboard or another guitar, use that. If not, just make sure it seems pretty close and go for it. Here’s an E to get you started:
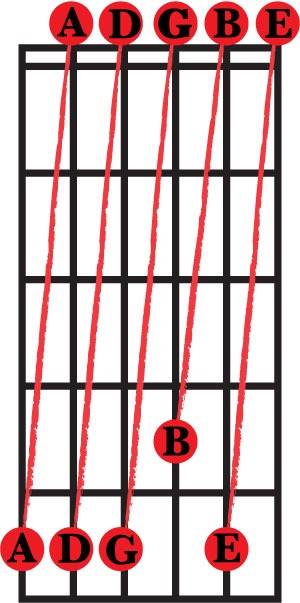
 Once you have string 6 in tune, you’ll tune string 5 (A) to the 5th fret of string 6, string 4 (D) to the 5th fret of string 5, string 3 (G) to the 5th fret of string 4, string 2 (B) to the fourth fret of string 3, and string 1 (high E) to the 5th fret of string 2.
Remember, they’re all tuned to the fifth fret, except for the B string. That’s because the B is tuned to an interval of a major third instead of a perfect fourth, but don’t worry about that for now.
If you did it correctly, strings 1 and 6 should sound like a low voice and a high voice singing the same note, because they’re two octaves apart, but they’re both ‘E’s.
Guitar Tuning Tips:
- Don’t pluck the string you’re tuning and the one you’re tuning it to at the same time. Instead, pluck your reference string, and then pluck the string you’re tuning while the first string is still ringing. That way, you’ll be able to hear whether the string you’re tuning is sharp (too high in pitch) or flat (too low).
- If you can reach your tuning pegs with your picking hand, try reaching up and tuning with it, instead of using your fretting hand. That way, you’ll be able to listen to your strings change pitch as you tune them, which can make them easier to tune. It will feel awkward at first, but you’ll get used to it.
- If you listen carefully, you’ll hear the sound waves coming from the two strings bouncing off each other. It will sound like this:
Notice how the waves slow down as the two strings get closer to the same pitch, and eventually stop. When they stop, you’ll know your strings are in tune.
Now you know how to tune your guitar using relative tuning. If you have any questions or tips you’d like to add, feel free to join the conversation in the comments section below.